Sunday, October 26, 2008

Fuel Injection

I have been gathering research on the future fuel injection system for the 440. I am going to use a GM Throttle body with a purchased adapter plate. I could make one, but I can get the plate, gaskets, hardware for $46, so it is worth the time savings. I have learned that I should not use the throttle body from a small bock Chevy, but one from a big block 454 and maybe even bore it out to 54mm for more torque. http://www.affordable-fuel-injection.com sells an almost all inclusive system for about $1600. Hmm Looks like the DIY route is the way to go, can do it for a lot less, but need to get the 454 T-body first....

Wednesday, October 22, 2008

Engine and Seating

A day ago I decided the stump that once supported a passenger seat needed replacement, so I took it out and put in the 2/3rds bench seat had I pulled from a Winnebago. Even though it is not pretty, it is worlds more functional than what was there before, which was practically nothing.

I started preliminary work on the the fuel injection upgrade by measuring and drawing the mating surface of the 440's intake manifold. Later I will measure and draw the bottom of the Chevy 350's throttle body fuel injection base. While I was working in the engine "bay", I decided to adjust the ignition timing after adjusting the linkages on the carburetor. I must say it works much better, you can really hear the throaty rumble when the secondaries kick-in. WooHoo!

Wednesday, October 15, 2008

This and That

Today's finished tasks were small, but something else to cross-off the list. I finished installing the electrical outlet under the ESD workstation, and I completed the support legs for the other workstation. I made coffee today in the "hobo pot" (as good friend of mine calls it) while my brother was over visiting. He ordered an 400W Air-X WTG (wind turbine generator) and had it delivered to my house. Tonight we made a trip to Lowes and Home Depot to get assorted hardware to build the short tower to attach it to his Airstream trailer. He is in the process of building his new house and lives off-grid in his trailer for now. Until he gets his WTG going, he only has 75w of PV panels to charge his two batteries (not really enough for this tech. age).

The other day, I put in another track light with LED lights above the 2nd workstation, and moved the existing light to the end of the closets near the bed. There were lights there originally, but my Travco lacked them when I got it. I got the LED lights from Sams Club, and after reverse engineering them, discovered I can run them off of 12V after some modifications, so I can use them dry camping without turning on my 1500W modified sine-wave inverter. Eventually I will have the inverter connected to automatically engage on power failure/disconnect from the grid. (I'll only have it connected to the lighting circuit breaker, not the AC, fridge, water heater, charger, etc.)

I have been looking on the http://www.vintagetrailersupply.com site that VoyageVixen has listed in her blog. Very cool, I will have to make a list of all the curtain related items I need to restore privacy to the rig. Also, I have to buy a new mattress, as the previous one was water-logged and tossed-out.

Tuesday, October 14, 2008

Instrumentation & Electrical Upgrades

In a previous post I wrote about my repairs on the fuel level sending unit. I have yet to repair my speedometer, so I use a GPS to monitor my speed. After a while it gets tiresome setting the GPS back into position on the dash again and again. While in Walmart, I noticed a suction mount for cell phones, and thought, aha! So, the glass on the speedo works great as a surface to mount the suction cup. Also armed with a 12v plug to USB converter, I power the GPS through any trip (yes I do drive my office).


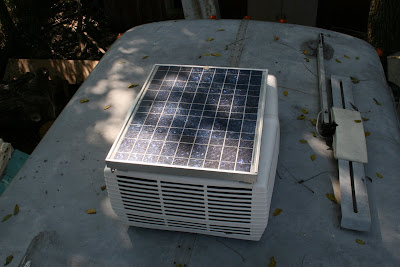
Another addition to the rig is a 40W Kyocera (KC-40) photovoltaic panel. When not plugged-in to the grid, it keeps the batteries from discharging from the draw of the refrigerator. I is not enough to handle keeping the inverter batteries charged if I am running my soldering irons, etc. though. I was fortunate that the panel size mounts well to the AC unit, so there are no additional holes in the roof, as I was able to run the wires through the AC's munting hole.

Monday, October 13, 2008

Workspace and Ground Clearance

My Travco is primarily my office and secondly an RV, so instead of a dinette and couch, I have two counter tops. One is an ESD (electrostatic discharge) safe soldering workstation for assembling printed circuit boards and the other one soon will be. Currently I put my laptop, programming computer and other assorted stuff on the second top. The walls will be future project, maybe when I start freezing to death I will fix them. When my brother puts spray foam in at his house, I will have to borrow his spray guns to insulate my walls! You can see the floor in some of the pics, I decided to put in wood floors... just not done yet. My current project is finishing the second counter top support legs and installing a 120v outlet under the first counter. I also need to install an outlet on one of the sides of the fridge so I can plug the microwave and toaster into something besides a makeshift extension cord.
Being an RV as well, I must keep the ability to secure everything easily for travel, sometimes down rough roads. In fact, one of the things I like about the Travco is it's excellent ground clearance, just like you see in the brochures, driving around down to the river banks. The 440 motor in this Travco came out of another Travco who's owner put in a 4-wheel drive Cummins diesel set-up into it. So it is hard to decide if I should add another gas tank I have that would reduce the clearance, or find one somewhere that would not. I think I will look around.

Thursday, October 9, 2008

Travco pulling an Airstream


Here is a picture of my brother's "new" Airstream hitched to my Travco while getting ready to pull-out of the HWY62RV. 60 plus feet of antique RV. So now, My Dad and step-mom have a 31 foot 2006 Fleetwood class C motorhome, my wife and I have a 27 foot 1966 Travco class A motorhome, and my brother has a 31 foot 1971 Airstream travel trailer. I doubt my Mother and step-dad will get the bug, but who knows, huh?

From the picture you can almost imagine what it looked like before someone put on all the primer paint on it. I can't wait to sand it all off and paint a different color stripe on it. Any suggestions?

My brother bought his Airstream to live in while he builds his house. If I ever build a new house, it is nice to know I have some options.

Friday, October 3, 2008

Specs for my 1966 Travco 270

1966 Model 270 Travco, 27 feet long, originally came with a Dodge 318 cubic inch engine, but was blown and replaced with a 1973 Dodge 440 cubic inch engine (440-3) with a 1973 3 speed 727 automatic transmission (727-3).
M-300 Chassis
It has a Kohler Generator:
6.5C61 5080A3/4
serial 277767
Controller A-245701
KW 6.5
KVA 6.5
VOLT 120/240
AMP/TERM 27.1
PHASE 1
CYCLES 60
RPM 1800
The generator has a flat-head 4-cylinder 59.4 cubic inch (.97 Liter) L600 engine.

Thursday, October 2, 2008

Furnace, Deep-cycle Batteries and Interconnection

This morning I finished putting the furnace back together and tested it. It ran perfectly after I got the air out of the propane lines, and re-attached the exhaust/intake vent cap outside. Without the cap, the furnace would choke itself out with its own exhaust.

The Travco came with two batteries, one up front for the engine and coach, the other in the back for the generator. A previous owner had installed a 2 gauge wire from the engine battery to a battery switch under the sink, with another 2 gauge wire coming from the generator battery to the same switch. I added a third 1/0 wire from the four inverter batteries, that I tied together with the inverter under the bed, to the switch. I wired the engine/coach battery as Main, the inverter batteries as #1, and the generator battery as #2. At the moment I don't have any battery isolators so, I have them all connected together so that my solar panel and charge controller can keep them charged (they also get charged when the engine or generator run). Also, since I am connected to the grid while at home, I use a battery charger to keep them topped up (like a charger/converter would... the charger that came with the Travco died). Since I use the Travco as an office and play the stereo and use the lights and soon the furnace, the batteries would soon die without a charger.


Battery Switch under the sink for the three battery sets.

Under the bed: engine fluids in crate, 35 gallon water tank (from a Winnebago, has level sensors, but not connected), leveling blocks in bags, bottle jack, inverter batteries tied in parallel, 1500 watt inverter, electric water heater, 2 gallon water pressure expansion tank.

One of my next projects will be to connect the 1500W modified-sine wave inverter to the 120v electrical system. Currently I must run an extension cord to where I need the power (if running the inverter for power), so I want to design, build, and put in an automatic transfer switch for the inverter to connect it without the generator or utility power connected.

Wednesday, October 1, 2008

Furnace Repairs

This afternoon, I worked on the propane furnace, as the fan didn't work. The furnace was made by International Oil Burner Company of St. Louis, MO. model # DC1520L, 12V 5.6A. The fan motor is a universal motor that requires periodic oiling of the bearings. I suspect that previous owners over-oiled it, and it gummed-up the brushes, as they would not slide (advance and engage the commutator). After cleaning-up the brushes, the blower worked great! It got too late to try it out, but I will tomorrow. Here are some pics for reference.

Fuel level sending unit fix

Today's task was to figure out why the gas gauge didn't work. It is a Dodge chassis and I was told by Greg Garner of Real Time Engineering (www.rt-eng.com, they repair and re-manufacture Mopar i.e. Dodge, and others guage/console components) that they should measure 80 Ohms empty. I determined the sending unit had a resistance of 80 Ohms, hmm empty, but I know it is not empty. So when I ground the wire, the gauge goes to full. Cool, gauge works. From working on replacing the plywood under the bed months before, I knew one of the previous owners had made a hole to access the sending unit, so I opened it up and after verifying it wasn't the wires that were bad, removed the unit from the tank. I determined the float had a hole in it, and luckily my parts store had a replacement float on the shelf, WOW! Car Quest# CPS80435 (stewart-warner #411290), $11.96 with tax. Yipee, now I can drive or operate the generator and be a "little" more relaxed. Oh, for those who might want to know, on my rig, the sending unit access hole is about 5" wide, 13" back from the corner edge of the bathroom, and 3" over toward the passenger side from the same edge.